Your kitchen sink works hard every single day. It handles greasy dishes, food scraps, and endless water flow. Over time, that daily grind leaves behind grime, hard water spots, and unpleasant odors. You notice the dull film, the faint smell when you walk past, and the way water no longer beads up nicely on the surface. The good news? You can fix all of this without expensive chemical sprays or toxic fumes. You simply need to know how to clean kitchen sink with vinegar. This natural method delivers professional-level results at a fraction of the cost and with zero harsh side effects.
Vinegar cuts through mineral buildup, kills odor-causing bacteria, and restores shine in minutes. You probably already have a bottle in your pantry. In this guide you will discover exactly how to clean kitchen sink with vinegar, why the method works so well, which tools you need, and how to keep your sink looking brand new for months. You will also learn advanced tricks for stubborn stains, safety tips for every sink material, and common mistakes that waste your effort. By the end, you will feel confident tackling your sink every week and enjoy a fresher, healthier kitchen.

Why Vinegar Works Wonders for Kitchen Sinks
You might wonder why a simple pantry staple beats commercial cleaners. The answer lies in chemistry. White distilled vinegar contains about five percent acetic acid. This mild acid dissolves calcium carbonate—the main ingredient in hard water deposits and limescale. When acetic acid meets those mineral crusts, it triggers a gentle reaction that breaks the bonds and lifts the gunk away. You see the proof when foam appears and the stains wipe off easily.
Moreover, vinegar acts as a natural disinfectant. Studies show acetic acid disrupts the cell walls of common kitchen bacteria such as E. coli and Salmonella. You do not need bleach to sanitize your sink. Vinegar does the job safely while leaving no harmful residue. You also avoid the strong fumes that irritate eyes and lungs. Families with children and pets especially appreciate this gentle approach.
You save money too. A single bottle of vinegar costs less than two dollars and lasts for dozens of cleanings. Compare that to specialty sink cleaners that run five to ten dollars per bottle and empty quickly. You reduce plastic waste at the same time because you reuse the same spray bottle for months. Environmentally conscious homeowners love that vinegar breaks down completely in wastewater without polluting rivers or harming aquatic life.
For example, homeowners in hard-water areas like many parts of Bangladesh report dramatic improvements after switching to vinegar. One family in Chattogram noticed their stainless steel sink stayed spot-free for three weeks instead of developing white rings within days. They now clean weekly and enjoy the peace of mind that comes from using food-safe ingredients around their cooking space.
You also protect your sink’s finish. Many commercial cleaners contain abrasives or strong alkalis that scratch stainless steel or etch porcelain over time. Vinegar cleans without scratching, so your investment in a quality sink lasts longer. You maintain resale value and keep your kitchen looking premium without extra effort.
Essential Materials You Need to Clean Kitchen Sink with Vinegar
You do not need fancy equipment. Gather these simple items and you are ready to learn how to clean kitchen sink with vinegar properly. Start with a bottle of white distilled vinegar. Choose the five-percent acidity version sold in any grocery store. Avoid apple cider vinegar for deep cleaning because its darker color and sugars can leave residue. You will also need baking soda for the powerful fizzing action that loosens drain clogs and stubborn grease.
Next, grab a spray bottle, microfiber cloths, an old toothbrush or soft scrub brush, and paper towels. You may want rubber gloves if you have sensitive skin, although vinegar rarely irritates. A small bowl helps you mix solutions, and a funnel makes filling the spray bottle mess-free. For extra shine on stainless steel, keep a few drops of olive oil or a dedicated stainless steel polish handy for the final step.
You can find everything at your local market for under five dollars total. Many people already own most items, so the first cleaning costs almost nothing. Store your vinegar cleaning kit under the sink for quick access. You will reach for it more often once you see the sparkling results.
Learn more natural cleaning secrets in our Ultimate Guide to Eco-Friendly Kitchen Maintenance
Step-by-Step Guide: How to Clean Kitchen Sink with Vinegar
Step 1: Preparation
You begin with preparation. Clear every item from the sink and surrounding counter. Remove the drain stopper and any sponges. This step ensures vinegar touches every surface and prevents cross-contamination. Take two minutes to wipe away loose debris with a dry cloth. You set the stage for deeper cleaning.
Step 2: Mix Your Vinegar Solution
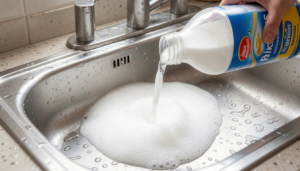
Fill the spray bottle three-quarters full with white vinegar. Add a teaspoon of dish soap if you want extra grease-cutting power. Shake gently. You now hold a powerful, pH-balanced cleaner that costs pennies per use.
Step 3: Apply and Let It Dwell
Spray the entire basin generously. Cover the sides, bottom, and corners. Let the vinegar sit for at least ten minutes. During this dwell time the acetic acid dissolves mineral deposits and loosens food residue. Do not rush this step. Patience delivers noticeably better results.
Step 4: Clean the Drain with Baking Soda and Vinegar
While the solution works, pour half a cup of baking soda directly into the drain. Follow immediately with one cup of vinegar. You hear the satisfying fizz as carbon dioxide forms and pushes debris upward. Let the mixture bubble for five full minutes. This reaction breaks apart grease and hair that ordinary plunging misses.
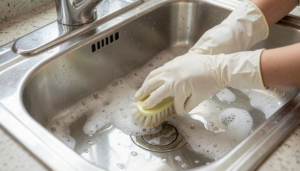
Step 5: Scrub, Rinse, and Dry
After the dwell period, scrub gently with your soft brush. Focus on the seams and faucet base. Rinse thoroughly with hot water. Dry everything with a fresh microfiber cloth. On stainless steel sinks, apply a tiny drop of olive oil and buff lightly for extra shine and protection.
Advanced Techniques for Tough Stains and Buildup
Some sinks face heavier challenges. Rust spots, coffee stains, or thick soap scum require extra attention. You still use vinegar as the base but add targeted methods. For rust on stainless steel, mix equal parts vinegar and salt into a paste. Apply it directly to the spot, let it sit twenty minutes, then scrub lightly. The salt acts as a mild abrasive while vinegar dissolves the iron oxide. Rinse well. You watch the rust disappear without damaging the metal.
Porcelain sinks sometimes develop yellowing from tea or coffee. Create a stronger solution by heating vinegar slightly in the microwave for thirty seconds. The warmth increases the acid’s effectiveness. Pour the warm vinegar over the stains and cover with paper towels soaked in more vinegar. Leave overnight. The next morning the stains lift away with a simple wipe. You save hundreds of dollars compared to professional refinishing.
For garbage disposals that smell sour, pour one cup of vinegar down the drain while the unit runs on cold water. Add ice cubes made from vinegar-water mixture and grind them. The ice sharpens the blades while the vinegar deodorizes and disinfects. You eliminate odors at the source instead of masking them with expensive pods.
Discover more expert natural cleaning advice in The Spruce’s Guide to Vinegar Cleaning
Daily and Weekly Maintenance to Keep Your Sink Spotless
Prevention beats deep cleaning every time. You develop simple habits that keep your sink looking showroom-ready. After every meal, rinse the basin with hot water and wipe dry. This single step prevents most buildup. Once a week, spray the sink with your vinegar solution and let it sit while you prepare dinner. The short dwell time maintains cleanliness without extra effort.
You also treat the drain monthly with the baking soda and vinegar fizz. This routine keeps pipes clear and odor-free. In hard-water regions you benefit even more because regular vinegar use stops limescale before it hardens. Your faucets stay shiny and your water pressure remains strong.
See our detailed guide on How to Clean Your Garbage Disposal Naturally for more tips
Common Mistakes to Avoid When You Clean Kitchen Sink with Vinegar
Many people rush the process and miss the best results. Never skip the dwell time. Vinegar needs those ten to twenty minutes to work its magic. You waste effort if you spray and wipe immediately. Another frequent error involves using vinegar on natural stone or unsealed grout. The acid can etch these surfaces. Always test a small hidden area first and dilute heavily if needed.
You also avoid mixing vinegar with bleach. The combination creates toxic chlorine gas. Stick to vinegar-only recipes for safety. Finally, do not use colored or flavored vinegars. They leave sticky residue that attracts more dirt. Plain white distilled vinegar remains the gold standard.
Safety Tips and Best Practices
You stay safe by working in a well-ventilated kitchen. Open a window while cleaning. Wear gloves if you have cuts or very sensitive skin. Keep vinegar away from children and pets during the cleaning process. Rinse all surfaces thoroughly before preparing food. These simple precautions let you enjoy the benefits of natural cleaning without worry.
Frequently Asked Questions About How to Clean Kitchen Sink with Vinegar
Is vinegar safe for stainless steel, porcelain, and composite sinks? Yes, vinegar works safely on stainless steel and porcelain when used as directed. The mild acidity removes stains without scratching. For composite sinks made of quartz or granite particles, dilute the vinegar fifty-fifty with water and test a small area first. You protect the sealant and maintain the beautiful finish. Many manufacturers actually recommend vinegar solutions in their care guides because they avoid the damage caused by abrasive powders.
How often should I clean my kitchen sink with vinegar? Weekly cleaning keeps your sink in top condition. In hard-water areas you may choose twice-weekly spot treatments. The beauty of this method lies in its speed. Once you master the routine, the entire process takes less than fifteen minutes. You prevent buildup instead of fighting heavy stains later. Families who adopt this schedule report sinks that still look new after two years of daily use.
Can I substitute apple cider vinegar for white vinegar? White distilled vinegar remains the best choice for deep cleaning. Apple cider vinegar contains sugars and pigments that can leave a slight film. Use it only for light surface wiping or odor control. You achieve superior results and avoid extra rinsing steps when you stick with clear vinegar.
What should I do if the vinegar smell lingers after cleaning? The natural vinegar aroma fades within thirty minutes as the surfaces dry. You speed the process by wiping with a cloth dampened in plain water after the final rinse. Adding a few drops of essential oil like lemon or tea tree to your spray bottle masks any remaining scent while adding extra antibacterial power. Most people actually enjoy the fresh, clean smell because it signals a truly sanitized sink.
Does the baking soda and vinegar method really unclog drains? Yes, the fizzy reaction creates pressure and mild abrasion that breaks apart grease and soap scum. For mild clogs it works wonders. Severe blockages may still need a plunger or professional help, but regular monthly treatments prevent most problems. You save hundreds on plumber visits by maintaining clear pipes naturally.
Are there surfaces I should never clean with vinegar? Avoid marble, granite, or travertine countertops that touch the sink. The acid can dull the polish over time. Use a pH-neutral cleaner on those surfaces instead. You also skip vinegar on unsealed cast iron or heavily waxed wood. For every other common kitchen sink material, vinegar remains safe and highly effective when you follow the guidelines in this guide.
How does cleaning with vinegar compare to commercial cleaners? Vinegar matches or exceeds commercial cleaners in stain removal and disinfection while costing far less and harming the environment less. You avoid volatile organic compounds that linger in the air. Independent tests show vinegar reduces bacteria counts by over ninety percent on kitchen surfaces. You gain peace of mind knowing your family eats from a surface cleaned with food-grade ingredients.
Conclusion
You now possess a complete, proven system for how to clean kitchen sink with vinegar. From the science behind the acid’s power to the exact step-by-step process and advanced techniques for tough jobs, every detail helps you achieve professional results at home. You save money, protect your health, and contribute to a cleaner planet with every cleaning session.
Take action today. Grab that bottle of vinegar, follow the steps, and watch your sink transform. Within one week you will notice the difference and wonder why you ever used harsh chemicals. Share your before-and-after photos in the comments and inspire others to switch to natural cleaning. Your kitchen deserves to sparkle, and vinegar makes it easy.
Explore our full library of natural home cleaning guides here
You have everything you need. Start small, stay consistent, and enjoy a fresher kitchen every single day. Happy cleaning!