How to Adjust ISO on a DSLR: A Complete Guide for Photographers
Photography is a blend of art and technical expertise. While composition and lighting are essential, knowing how to adjust ISO on a DSLR can dramatically improve your images, especially in challenging lighting conditions. ISO controls your camera’s sensitivity to light, directly affecting exposure, noise, and overall image quality.
Whether you are shooting in bright sunlight, a dimly lit room, or capturing fast-moving subjects, ISO is a tool that gives you control over your photography. In this guide, we’ll dive deep into ISO, explore practical techniques, give examples for different DSLR brands, and share advanced tips for professional results.
By the end of this article, you’ll have a complete understanding of ISO and how to use it creatively to enhance your photos.
What is ISO in Photography?
ISO stands for International Organization for Standardization, but in photography, it refers to the sensitivity of your DSLR camera’s sensor to light. Lower ISO values (e.g., 100–200) are less sensitive and ideal for bright environments, producing clean, noise-free images. Higher ISO values (e.g., 1600–6400+) increase sensitivity, allowing you to shoot in low-light situations, though higher values can introduce digital noise or grain.
ISO works in conjunction with aperture and shutter speed, forming the exposure triangle. Adjusting ISO lets you balance light and motion in your shots, giving you flexibility to adapt to various lighting conditions.
Why ISO Matters in Photography
Understanding ISO is crucial because it impacts:
- Exposure Control: Adjust ISO to brighten or darken images without changing aperture or shutter speed.
- Low-Light Photography: Capture evening landscapes, indoor events, or night skies effectively.
- Motion Capture: Higher ISO allows faster shutter speeds to freeze action.
- Noise Management: Knowing when and how to adjust ISO minimizes unwanted digital noise.
- Creative Flexibility: ISO adjustments let you experiment with depth of field, motion blur, and lighting effects.
Learning Changing ISO on a DSLR cameraempowers you to handle a wide variety of shooting scenarios confidently.
How ISO Works in a DSLR Camera
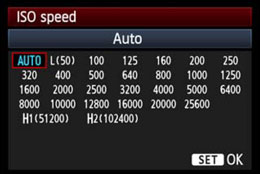
Every DSLR has a specific ISO range. Common ranges include 100–12,800, with some advanced models exceeding 50,000. Here’s a practical breakdown:
| ISO Value | Ideal Use Case | Effect on Image |
|---|---|---|
| 100–200 | Bright sunlight, outdoor photography | Clean, noise-free image |
| 400–800 | Cloudy conditions, indoor lighting | Slight noise, good quality |
| 1600–3200 | Dim lighting, evening portraits | Noticeable noise, faster shutter speed |
| 6400+ | Night photography, concerts, astrophotography | High noise, may need noise reduction |
The higher the ISO, the more sensitive the sensor becomes to light, but image quality may degrade. Balancing ISO with aperture and shutter speed is key for professional results.
Step-by-Step Guide: DSLR ISO settings guide
Here’s a practical guide for adjusting ISO on your DSLR, whether you are a beginner or advanced user:
Step 1: Locate the ISO Button
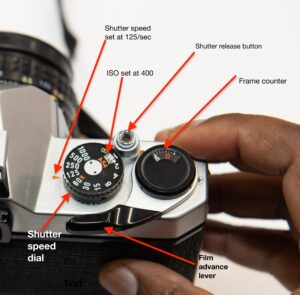
Most DSLR cameras, like Canon EOS, Nikon D-Series, or Sony Alpha, have a dedicated ISO button. Pressing it opens the ISO settings on the LCD screen or viewfinder.
Step 2: Choose Auto or Manual ISO
- Auto ISO: The camera selects the ISO for you based on lighting. Great for beginners or fast-changing conditions.
- Manual ISO: You set the ISO value yourself for creative control and precise exposure.
Step 3: Adjust the ISO Value
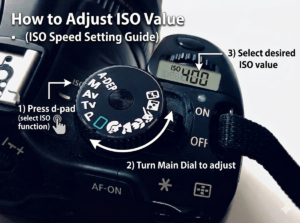
Use your camera dial or menu to increase or decrease ISO. Tips:
- Use lower ISO (100–400) in bright light for crisp images.
- Use higher ISO (1600–6400+) in low-light conditions, but be mindful of noise.
Step 4: Check Exposure
After setting ISO, review your image on the LCD screen. Adjust shutter speed or aperture if needed to achieve perfect exposure.
Step 5: Take Test Shots

Always take a test shot. Check for:
- Noise levels
- Exposure accuracy
- Motion blur
Adjust ISO and other settings until you achieve the desired result.
Practical Examples: ISO in Real Scenarios
Here are some real-world scenarios showing how ISO impacts photography:
Scenario 1: Outdoor Landscape in Daylight
- ISO: 100
- Aperture: f/11
- Shutter Speed: 1/125s
Result: Crisp, sharp images with minimal noise.
Scenario 2: Indoor Event Photography
- ISO: 800–1600
- Aperture: f/2.8
- Shutter Speed: 1/60s
Result: Adequate exposure in dim lighting without excessive noise.
Scenario 3: Action Photography (Sports)
- ISO: 1600–3200
- Aperture: f/4
- Shutter Speed: 1/1000s
Result: Freezes motion effectively, slightly higher noise acceptable.
Scenario 4: Night Sky Photography
- ISO: 3200–6400+
- Aperture: f/2.8
- Shutter Speed: 15–30s
Result: Captures stars and low-light details, noise reduction may be needed.
These examples illustrate how knowing How to Adjust ISO on a DSLR helps you adapt to different lighting and shooting conditions.
Tips for Adjusting ISO on a DSLR
- Start with the Lowest ISO: Avoid unnecessary noise.
- Use Auto ISO When Moving Fast: Useful for sports or wildlife.
- Balance Exposure Triangle: Don’t rely solely on ISO. Aperture and shutter speed matter.
- Understand Your Camera’s ISO Performance: Some DSLRs handle high ISO better than others.
- Use Noise Reduction Tools: Software like Adobe Lightroom can help minimize noise at high ISO.
- Experiment in Different Lighting Conditions: Practice in sunlight, shade, and low-light to understand ISO’s effects.
Advanced Techniques Using ISO
1. ISO Bracketing
Take multiple shots at different ISO values. Later, choose the best exposure for editing.
2. Creative Low-Light Shots
Raise ISO to capture the atmosphere of dimly lit venues while using a wide aperture for depth of field.
3. Night Photography
Use a tripod with a lower ISO to minimize noise, or raise ISO for faster shutter speeds when shooting moving subjects.
4. Fast-Moving Subjects
Higher ISO allows faster shutter speeds, reducing motion blur and capturing crisp action.
Common Mistakes to Avoid
- Using unnecessarily high ISO in bright light.
- Ignoring shutter speed and aperture adjustments.
- Over-relying on Auto ISO without reviewing results.
- Forgetting to test and analyze images for noise and exposure.
Avoiding these mistakes ensures your images are clear, vibrant, and professional-looking.
DSLR Brand-Specific ISO Tips
Canon DSLR
- Auto ISO works well in low light.
- Some models allow ISO expansion, going beyond standard ranges for extreme low-light situations.
Nikon DSLR
- Nikon cameras handle noise well up to ISO 3200 or 6400.
- ISO sensitivity fine-tuning is available in advanced Nikon models for custom control.
Sony DSLR/Alpha
- Sony sensors excel at high ISO performance.
- Useful for night photography without excessive noise.
Conclusion
Mastering DSLR ISO control tips gives photographers complete control over exposure, lighting, and image quality. By understanding ISO, practicing in real-world scenarios, and combining it with aperture and shutter speed, you can create stunning, professional-quality images in any lighting condition.
Remember: start low, experiment carefully, and monitor your results. With consistent practice, ISO will become a powerful tool in your photography toolkit.