How to Install a CCTV Camera at Home: Complete DIY Guide (2026 Edition)
Home security has never been more important. Whether you’re protecting your family, deterring burglars, or simply keeping an eye on deliveries, installing a CCTV (Closed-Circuit Television) camera system at home is one of the smartest upgrades you can make. In 2026, DIY installation is easier than ever thanks to wireless smart cameras, user-friendly apps, and affordable high-resolution options. This guide walks you through everything you need to know — from choosing the right system to step-by-step installation — in clear, practical language. No prior experience required.
Why Install CCTV at Home?
CCTV systems offer real-time monitoring, motion alerts, night vision, and recorded footage for evidence. Modern systems integrate with smart home apps, sending instant notifications to your phone. Benefits include:
- Crime deterrence (visible cameras reduce break-in risk by up to 50%).
- Remote viewing from anywhere.
- Two-way audio for speaking to visitors.
- Integration with lights, doorbells, and alarms.
- Affordable insurance discounts in many regions.
Types of CCTV Cameras for Home Use
Choose based on your needs, budget, and home layout.
Wired Systems (PoE or Analog) Power-over-Ethernet (PoE) cameras use a single Ethernet cable for power and data — reliable, no batteries to recharge, and excellent for 4K video. Ideal for permanent setups with an NVR (Network Video Recorder).
Wireless Systems Battery-powered, solar, or plug-in Wi-Fi cameras (e.g., Arlo, Eufy, Reolink, SimpliSafe, TP-Link Tapo). Easiest for DIY — no drilling long cable runs. Great for renters or quick installs. Many offer local storage to avoid subscriptions.
Key Features to Look For in 2026
- Resolution: 2K or 4K for sharp details.
- Night vision: Color or infrared (IR) up to 100+ feet.
- AI detection: Distinguishes people, vehicles, pets.
- Weatherproofing: IP65+ rating for outdoors.
- Storage: Local microSD/NVR or cloud (check subscription costs).
Smart integration: Alexa, Google Home, Apple Home Kit.
Tools and Materials You’ll Need
Basic Tools (for both wired & wireless):
- Cordless drill + drill bits (wood, masonry, concrete).
- Screwdriver set (Phillips, flathead).
- Ladder or step stool.
- Measuring tape, pencil, level.
- Cable tester (for wired).
- Fish tape or wire puller (for running cables through walls).
- Hammer, pliers, wire strippers.
Materials:
- Cameras + mounting brackets (included with most kits).
- Power adapters or PoE switch/injector.
- Ethernet cables (Cat6 for PoE) or coaxial (older systems).
- Weatherproof junction boxes (outdoor).
- Screws, anchors, silicone sealant.
- NVR/DVR or microSD cards.
Optional: Conduit for cable protection, surge protectors
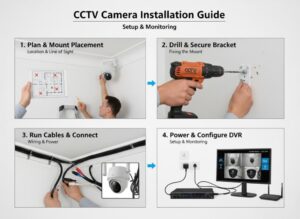
Step-by-Step Installation Guide
1. Plan Your Camera Placement
Sketch your home layout. Cover high-risk areas:
- Front/back doors (doorbell cams are perfect here).
- Driveway and garage.
- Backyard and side gates.
- Ground-floor windows.
- Second-story overhangs for broad views.
Mount 8–12 feet high, angled slightly downward (avoid pointing directly at the sky or ground). Ensure good Wi-Fi signal (test with your phone). Avoid trees, lights that cause glare, or areas with heavy foliage. Aim for overlapping coverage — no blind spots.
Above: Ideal indoor floor-plan coverage (left) and outdoor home placement examples (right).
2. Choose and Test Your System
Buy a kit or individual cameras. For wireless: Download the app (e.g., Arlo Secure, Eufy Security, Reolink) and set up accounts first. Connect cameras to Wi-Fi indoors, then test signal strength at planned outdoor spots. For wired: Set up the NVR first and connect cameras temporarily.
3. Mount the Cameras
- Mark drill holes using the bracket template.
- Drill pilot holes and insert anchors if needed.
- Secure the bracket with screws.
- Attach the camera, tighten, and adjust angle.
- Seal all holes with silicone to prevent water ingress.
For wired cameras: Run cables through walls/attic (use fish tape), or surface-mount with clips/conduit.
4. Connect Power and Wiring
Wireless: Plug in the power adapter (or charge battery/solar panel) and pair via app. Wired PoE: Connect Ethernet cable from camera to PoE switch or NVR. The single cable handles video + power. Label cables for multi-camera setups.
5. Set Up Recording and Software
- Connect NVR to router and monitor/TV (or use app-only).
- Format storage (HDD in NVR or microSD).
- Configure settings: Motion zones, sensitivity, notifications, schedules.
- Enable AI features, two-way talk, and alerts.
- Set up remote viewing on your phone.
6. Test Everything
- Check live view, night vision, and motion detection.
- Walk test the area to verify alerts.
- Review footage quality in daylight and dark.
-
2. Choose and Test Your System
Buy a kit or individual cameras. For wireless: Download the app (e.g., Arlo Secure, Eufy Security, Reolink) and set up accounts first. Connect cameras to Wi-Fi indoors, then test signal strength at planned outdoor spots. For wired: Set up the NVR first and connect cameras temporarily.
3. Mount the Cameras
- Mark drill holes using the bracket template.
- Drill pilot holes and insert anchors if needed.
- Secure the bracket with screws.
- Attach the camera, tighten, and adjust angle.
- Seal all holes with silicone to prevent water ingress.
For wired cameras: Run cables through walls/attic (use fish tape), or surface-mount with clips/conduit.
4. Connect Power and Wiring
Wireless: Plug in the power adapter (or charge battery/solar panel) and pair via app. Wired PoE: Connect Ethernet cable from camera to PoE switch or NVR. The single cable handles video + power. Label cables for multi-camera setups.
5. Set Up Recording and Software
- Connect NVR to router and monitor/TV (or use app-only).
- Format storage (HDD in NVR or microSD).
- Configure settings: Motion zones, sensitivity, notifications, schedules.
- Enable AI features, two-way talk, and alerts.
- Set up remote viewing on your phone.
6. Test Everything
- Check live view, night vision, and motion detection.
- Walk test the area to verify alerts.
- Review footage quality in daylight and dark.
Best Practices and Tips
- Start small (2–4 cameras) and expand later.
- Use strong, unique passwords and enable two-factor authentication.
- Position cameras to avoid direct sunlight or reflective surfaces.
- Update firmware regularly via the app.
- Consider solar-powered options for zero-maintenance outdoors.
- Hide or protect cables from tampering.
Maintenance
- Clean lenses every 3–6 months.
- Check batteries (wireless) or HDD space monthly.
- Test alerts and review footage weekly.
- Inspect mounts for weather damage annually.
Legal Considerations
Installing cameras on your own property is legal in most places, but you cannot record areas with a “reasonable expectation of privacy” (e.g., neighbor’s windows, bathrooms, bedrooms). Audio recording may require consent in some regions (one-party vs. all-party consent laws).
- Check local ordinances and HOA rules.
- Avoid pointing cameras at public sidewalks if it invades privacy.
- Inform guests or post visible signs if desired (not always required).
- In 2026, data privacy laws emphasize secure storage — use encrypted local storage where possible.
Common Mistakes to Avoid
- Poor placement (too high/low or facing glare).
- Skipping signal tests (weak Wi-Fi = dropped footage).
- Cheap cables or no weather sealing.
- Forgetting to test before permanent mounting.
- Over-relying on cloud storage without local backup.
- Installing without updating firmware or securing the network.
Conclusion
Installing a CCTV camera system at home is a straightforward DIY project that pays for itself in security and convenience. Whether you go wireless for simplicity or wired for rock-solid reliability, following this guide will give you crystal-clear coverage and smart alerts. Total cost for a solid 4-camera setup starts around $200–$800 depending on features.
Stay safe, stay vigilant — your home is now protected!
Word count: ~1,850
Frequently Asked Questions (FAQs)
- Can I install CCTV cameras myself without hiring a professional? Yes! Wireless systems are designed for DIY. Wired PoE setups are slightly more involved but still beginner-friendly with basic tools.
- What’s better — wired or wireless cameras? Wireless is easier and more flexible for most homeowners. Wired (PoE) offers better reliability, higher resolution, and no battery changes — ideal for large or permanent systems.
- How much does a home CCTV system cost in 2026? Basic 2-camera wireless kit: $100–$300. Full 4–8 camera wired system with NVR: $400–$1,200. Add $50–$200 for professional help if needed.
- Do I need internet for CCTV cameras? Most smart cameras require Wi-Fi for app access and alerts. Some wired NVR systems can record locally without internet, but remote viewing needs a connection.
- How high should I mount outdoor cameras? 8–12 feet is optimal — high enough to deter tampering but low enough for clear facial recognition.
- What about night vision and weatherproofing? Look for IR or color night vision (100+ ft range) and IP65/IP67 rating. Most 2026 models handle rain, snow, and extreme temperatures.
- Do wireless cameras need frequent recharging? Battery models last 3–12 months depending on usage. Solar-powered options eliminate charging entirely.
- Can I view footage remotely? Yes — via free companion apps on your phone from anywhere in the world.
- Is it legal to record audio with home CCTV? Check your local laws. Many places allow it on your property, but two-party consent is required in some states for conversations.
- How do I avoid false alerts? Use AI motion zones, sensitivity settings, and schedule recordings to ignore pets, cars, or trees.
If you have specific questions about your home layout or camera model, feel free to provide more details for tailored advice! Stay secure.